Car Side Mirror Glass Replacement Guide for Beginners
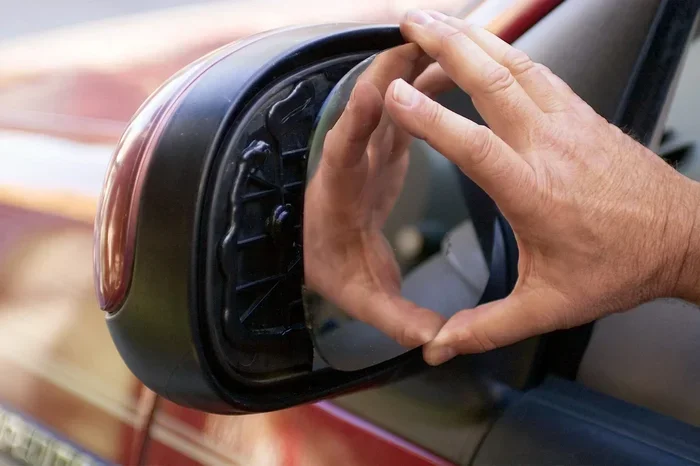
Replacing your car side mirror glass is easier than most people think, and it can save you hundreds of dollars compared to a dealership visit. This guide walks beginners through every step, from choosing the right mirror glass to final installation. You will learn the common causes of mirror damage, the tools you need, and how to avoid costly mistakes.
Driving with a cracked or shattered side mirror is not just annoying. It is a safety hazard. Your side mirror glass gives you a clear view of what is happening beside and behind your car. When that glass breaks, your visibility drops and your risk on the road goes up.
The good news? You do not need to be a mechanic to fix it. A car side mirror glass replacement is one of the simplest auto repairs you can do at home. With the right tools and a little patience, most beginners finish the job in under an hour. This guide shows you exactly how.
Whether your mirror cracked from a rock on the highway, a parking lot bump, or harsh weather, this guide has you covered. We will walk you through every step in plain language. No jargon. No confusing instructions. Just clear, practical advice that works.
Let us get into it and help you get your car looking and driving like new again.
Key Takeaways
- DIY replacement saves money: Replacing side mirror glass yourself costs a fraction of what a mechanic charges.
- The right tools make the job easy: You only need a few basic items to complete the replacement.
- Safety first: Always handle mirror glass carefully and work in a safe location.
- Matching the glass is key: Getting the correct size and type ensures a perfect fit and clear visibility.
- Adhesive matters: Using the proper mirror adhesive ensures a strong, long-lasting bond.
- Common mistakes are avoidable: Knowing what to watch out for prevents damage and frustration.
📑 Table of Contents
- Why Side Mirror Glass Breaks
- Tools and Materials You Will Need
- How to Choose the Right Replacement Mirror Glass
- Step-by-Step Replacement Process
- Side Mirror Glass Replacement Cost Comparison
- Common Mistakes to Avoid
- When to Call a Professional Instead of DIY
- Tips for Maintaining Your New Side Mirror Glass
- Final Thoughts
Why Side Mirror Glass Breaks
Understanding why your mirror glass breaks helps you prevent future damage. Side mirrors take a lot of abuse on the road. They sit exposed on the sides of your car and are vulnerable to all kinds of impacts.
Common Causes of Mirror Glass Damage
- Road debris: Rocks, gravel, and other debris kicked up by passing trucks can chip or crack your mirror glass. This is the number one cause of side mirror damage.
- Parking lot bumps: Hitting a curb, a pole, or another car in a tight parking space can crack or shatter the mirror glass.
- Weather damage: Hail storms, extreme heat, and sudden temperature changes can weaken mirror glass over time. Can a car overheat on a hot day? Yes, and extreme heat can also affect your mirror components.
- Vandalism or accidents: Sometimes damage is just bad luck. Vandalism or minor fender benders can crack or break your side mirror.
- Age and wear: Over time, the adhesive that holds the mirror glass weakens. Old mirrors are more prone to cracking and popping out.
No matter the cause, the fix is the same. You need to replace the glass. And the sooner you do it, the better. Driving without a working side mirror is dangerous and in many places, it is also illegal.
Tools and Materials You Will Need
Before you start, gather everything you need. Having all your tools ready makes the process smooth and fast. You do not want to stop halfway through because you are missing something.
Essential Tools
- Replacement mirror glass: This is the most important item. Make sure you get the right size and shape for your car model.
- Mirror adhesive: A strong automotive adhesive designed specifically for mirror glass. Do not use regular super glue.
- Rubbing alcohol or glass cleaner: You need this to clean the surface before applying adhesive.
- Microfiber cloth: For cleaning both the mirror housing and the new glass piece.
- Masking tape: This helps hold the new glass in place while the adhesive sets.
- Protective gloves: Mirror glass can be sharp. Protect your hands.
- Soft cloth or towel: To cushion the mirror housing while you work.
Pro tip: Keep a roll of automotive tape and a small tube of adhesive in your glove box. You never know when you will need them. Also, check out how to remove unwanted things from car glass for more cleaning tips that come in handy during this process.
How to Choose the Right Replacement Mirror Glass
Not all side mirror glass is the same. Choosing the right replacement glass is crucial for a proper fit and good visibility.
Types of Side Mirror Glass
- Standard flat glass: This is the most basic type. It provides a true reflection without distortion. Common on older car models.
- Convex glass: This curved glass gives a wider field of view. It is the most common type on modern cars. The trade-off is slight distortion at the edges.
- Aspheric glass: This is a more advanced convex glass with varying curvature. It reduces distortion significantly. Found on many newer vehicles.
- Heated mirror glass: This type has a built-in heating element to melt frost and ice. Common in cold climate vehicles.
- Turn signal mirror glass: Some mirrors have integrated turn signals built into the glass or housing.
Where to Buy Replacement Mirror Glass
- Auto parts stores: Stores like AutoZone and O’Reilly carry mirror glass for popular car models.
- Online retailers: Amazon and eBay offer a wide selection. Just make sure you match your car make, model, and year.
- Dealerships: The most expensive option but guaranteed to fit perfectly.
- Aftermarket suppliers: Companies like Dorman and K-Source make quality replacement glass at lower prices.
Quick tip: Before buying, measure your old glass carefully. Even a few millimeters off can cause a poor fit. Write down the dimensions and bring them with you when you shop.
Step-by-Step Replacement Process
Now for the part you have been waiting for. Here is the actual replacement process broken down into simple steps. Follow along carefully and you will have a new mirror glass in no time.
Step 1: Remove the Old Mirror Glass
- Put on your protective gloves. Broken glass is sharp and dangerous.
- Place a soft towel around the mirror housing to catch any small pieces of glass.
- If the glass is cracked but still attached, place masking tape over it. This prevents shards from flying off.
- Gently pull the old glass away from the housing. Work slowly and carefully.
- If the glass is stuck, do not force it. Use a plastic scraper to gently pry it loose.
- Dispose of the old glass safely in a sturdy container.
Be very careful during this step. Even small shards can cause deep cuts. If the glass is badly shattered, consider wearing safety goggles.
Step 2: Clean the Mirror Housing
- Use rubbing alcohol and a microfiber cloth to clean the mounting surface inside the housing.
- Remove all old adhesive residue. A clean surface is essential for the new adhesive to bond properly.
- Let the surface dry completely before moving to the next step.
- Wipe down the new mirror glass with a clean, lint-free cloth.
Do not skip this step. Dust or old adhesive will prevent the new glass from sticking properly. A clean surface is the secret to a long-lasting repair.
Step 3: Apply Adhesive to the New Glass
- Apply a thin, even layer of mirror adhesive to the back of the new glass piece.
- Less is more. Too much adhesive will squeeze out and make a mess.
- Wait about 60 seconds after applying the adhesive. This lets it become tacky, which improves the bond.
- If your adhesive requires priming, apply the primer first and let it dry before adding the adhesive.
Expert insight: Different adhesives have different cure times. Always read the instructions on your specific product. Some adhesives set in minutes while others need several hours for a full bond.
Step 4: Install the New Mirror Glass
- Carefully place the new glass onto the mounting surface in the housing.
- Press it firmly into place. Make sure it is centered and aligned correctly.
- Use masking tape to hold the glass in position while the adhesive sets.
- Wipe away any adhesive that squeezes out immediately with a damp cloth.
- Let the adhesive cure according to the product instructions. This usually takes 24 to 48 hours.
Do not drive your car during the curing period if possible. Wait at least a few hours before driving. A fully cured bond is a strong bond.
Step 5: Test Your New Mirror
- After the adhesive has cured, adjust the mirror to your preferred position.
- Check for any cracks or gaps in the glass.
- Make sure the mirror holds firmly. Give it a gentle tug to test the bond.
- Clean the new glass with a glass cleaner and microfiber cloth.
If you want to protect your new mirror from future damage, consider using a car windshield sunshade when parked. It reduces heat exposure and can help protect all your car glass, including mirrors, from thermal stress.
Side Mirror Glass Replacement Cost Comparison
Cost is one of the main reasons people choose DIY replacement. Here is a quick comparison of your options.
| Option | Cost Range | Time Required | Skill Level |
|---|---|---|---|
| DIY Replacement | $15 – $50 | 30 – 60 minutes | Beginner |
| Mobile Mechanic | $75 – $150 | 30 – 60 minutes | None needed |
| Auto Repair Shop | $100 – $250 | 1 – 2 hours | None needed |
| Dealership | $150 – $400 | 1 – 3 hours | None needed |
As you can see, DIY replacement saves you a significant amount of money. The parts alone cost between $15 and $50 for most car models. The entire process takes less than an hour for most beginners.
Of course, if you are not comfortable doing it yourself, a mobile mechanic is a great middle-ground option. They come to you and do the work for a reasonable price.
Common Mistakes to Avoid
Even simple jobs can go wrong if you are not careful. Here are the most common mistakes people make when replacing side mirror glass and how to avoid them.
Mistake 1: Using the Wrong Adhesive
Regular household glue or super glue will not work for mirror glass. These adhesives do not withstand the vibration, heat, and cold that car mirrors experience daily. Always use a dedicated automotive mirror adhesive.
Mistake 2: Skipping Surface Preparation
A dirty surface is the number one reason mirror glass falls off after replacement. Take the time to clean the housing thoroughly. Remove every trace of old adhesive for the best bond.
Mistake 3: Driving Too Soon
It is tempting to hop in the car and go right after installation. But adhesive needs time to cure. Wait at least a few hours, and ideally 24 hours, before driving your car.
Mistake 4: Buying the Wrong Glass Size
Mirror glass looks similar across different car models, but sizes can vary. Always double-check the dimensions and your car make and model before purchasing.
Mistake 5: Ignoring Electrical Components
Many modern mirrors have built-in turn signals, heating elements, or blind spot monitoring. If your mirror has any of these features, be careful not to damage the wiring during replacement. If you are unsure, consult a blind spot monitoring specialist or a professional mechanic.
When to Call a Professional Instead of DIY
DIY replacement works great for most side mirror glass repairs. But there are situations where it is better to call a professional.
- Damaged mirror housing: If the plastic housing is cracked or broken, replacing just the glass will not fix the problem. You need a new housing or a full mirror assembly.
- Power mirror issues: If your mirror has electric controls and the motor or wiring is damaged, a professional has the tools and knowledge to fix it properly.
- Heated or smart mirrors: Advanced mirrors with heating, auto-dimming, or camera systems are complex. The DIY route is not always practical for these.
- Multiple mirrors damaged: If more than one mirror is damaged, the cost of professional repair may be worth the convenience.
- No confidence: There is no shame in paying a professional. If you are not comfortable with any part of the process, a mechanic will do a great job.
Remember, your side mirrors are critical for safe driving. If you are not 100% confident in the repair, it is worth the investment to have it done professionally.
Tips for Maintaining Your New Side Mirror Glass
You just replaced your mirror glass. Now you want it to last. Here are some simple tips to keep your new mirror in great shape for years to come.
- Wash your mirrors regularly: Dirt and grime can weaken the adhesive over time. Clean your mirrors with a gentle glass cleaner and a soft cloth.
- Avoid high-pressure car washes: The strong spray can loosen mirror glass, especially if the adhesive is not fully cured. Use a gentle hand wash instead.
- Be careful in tight spaces: Park carefully and avoid scraping your mirrors against walls or other cars.
- Check the adhesive periodically: Every few months, give your mirror a gentle tug. If it feels loose, reapply adhesive before it falls off completely.
- Use a mirror cover in harsh weather: In areas with heavy snow or hail, a mirror cover can protect your glass from damage. This is especially helpful during winter storms.
Proper maintenance goes a long way. A little care now can prevent another replacement down the road.
Final Thoughts
Replacing your car side mirror glass is one of the easiest and most rewarding DIY auto repairs you can do. It saves you money, teaches you something new, and gets your car back to safe and road-ready condition. The entire process is straightforward, and with the right tools and a little patience, anyone can do it.
Start by gathering your materials. Choose the correct replacement glass for your vehicle. Follow each step carefully. And most importantly, do not rush the adhesive curing process.
Your safety on the road depends on clear visibility. A working side mirror is a small but essential part of that. Take care of it, and it will take care of you.
Now that you know how easy this repair is, there is no reason to put it off. Grab your replacement glass and get to work. Your car and your wallet will thank you.
Frequently Asked Questions
How much does it cost to replace a car side mirror glass?
DIY replacement costs between $15 and $50 for the glass and adhesive. Professional replacement ranges from $75 to $400 depending on your car model and where you go. The DIY route is by far the most affordable option.
Can I drive with a cracked side mirror glass?
It is not recommended. A cracked mirror reduces your visibility and can worsen over time. In many states, driving with a damaged mirror is illegal. Replace the glass as soon as possible for safety and to avoid a ticket.
How long does the adhesive take to fully cure?
Most automotive mirror adhesives require 24 to 48 hours for a full cure. You can usually drive after a few hours, but avoid adjusting the mirror or exposing it to water during the curing period.
Do I need any special tools for mirror glass replacement?
No special tools are needed. You only need basic items like rubbing alcohol, microfiber cloths, masking tape, and protective gloves. The replacement glass usually comes with adhesive already included.
Can I replace just the glass, or do I need a whole new mirror?
In most cases, you can replace just the glass. The housing and mounting mechanism usually remain intact. Only replace the full mirror assembly if the housing is cracked or the electric components are damaged.
What is the best adhesive for car mirror glass?
Look for a dedicated automotive mirror adhesive from brands like Permatex or 3M. These adhesives are designed to handle the vibration, temperature changes, and weather exposure that car mirrors face every day.
=== CONCLUSION ===
A car side mirror glass replacement does not have to be scary or expensive. With this guide, you have everything you need to tackle the job with confidence. From choosing the right glass to applying the adhesive and letting it cure, each step is simple and manageable.
Remember, the key to a successful replacement is patience and preparation. Clean your surfaces well, use the right adhesive, and give it enough time to cure. Your new mirror glass will look great and keep you safe on the road.
Now it is your turn. Grab your replacement glass, gather your tools, and get started. You will be glad you did. And once you finish, you will know that you can handle this kind of repair on your own in the future.