Should New U-Joints Be Stiff Here Is What You Need to Know
New u-joints should never feel overly stiff or too loose. A stiff u-joint can transmit harsh vibrations, wear out bearings, and even snap the driveshaft. This guide explains how to spot the right stiffness, avoid common mistakes, and keep your drivetrain smooth for miles.
You just popped the hood and replaced a worn u-joint. Now the driveshaft feels tight, almost locked. You wonder, should new u-joints be stiff? The short answer is no. A fresh universal joint should spin freely with no gritty resistance and no sloppy wobble. Getting the stiffness right is one of the most overlooked steps in drivetrain maintenance.
When a u-joint is too stiff, it transfers harsh shock loads through the driveshaft. That can wear out transmission output bearings, crack yokes, and cause annoying vibration at highway speeds. On the flip side, a loose u-joint creates play, clunks, and eventual failure. This guide walks you through everything you need to know about u-joint stiffness, from factory specs to aftermarket upgrades. You’ll learn how to test your new joint, spot the warning signs, and make sure your drivetrain stays smooth and quiet.
Key Takeaways
- Right stiffness matters: A new u-joint should rotate freely with no binding, but have zero play.
- OEM is a safe baseline: Factory u-joints offer the best balance of stiffness and flexibility for most vehicles.
- Stiffness causes vibration: An overly tight u-joint puts extra stress on the transmission, yoke, and needle bearings.
- Check the slip joint: The slip joint should move in and out smoothly without grinding.
- Greasing prevents failure: Regular lubrication keeps the trunnion and bearing caps happy.
- Listen and feel: A clunk or vibration at speed is a red flag that the u-joint stiffness is off.
📑 Table of Contents
- What Is a U-Joint and Why Does Stiffness Matter?
- Should New U-Joints Be Stiff? The Short Answer
- Signs Your New U-Joint Is Too Stiff or Too Loose
- How to Install New U-Joints with the Right Stiffness
- Common Mistakes That Make New U-Joints Feel Stiff
- How to Choose the Right U-Joint for Your Vehicle
- Conclusion: Finding the Perfect Balance
What Is a U-Joint and Why Does Stiffness Matter?
The Role of the Universal Joint
A u-joint, short for universal joint, connects two rotating shafts that aren’t perfectly aligned. In most rear-wheel trucks, it links the transmission output to the rear axle pinion. In front-wheel-drive vehicles, similar joints called CV joints do the job, but the basic idea is the same. The joint must flex as the suspension moves up and down, while still transferring engine torque smoothly.
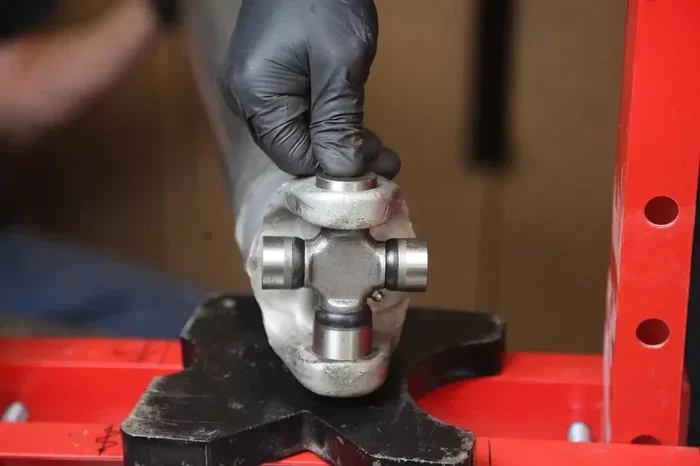
The key parts inside a u-joint include the cross or trunnion, four bearing caps, and needle bearings. The bearing caps sit in the yoke ears and pivot around the cross. When you install a new u-joint, the fit between these moving parts determines how stiff or loose the joint feels. That feel directly impacts vibration, noise, and longevity.
How Stiffness Affects Drivetrain Performance
Stiffness refers to the resistance you feel when you try to rotate the joint by hand. A properly seated new u-joint should turn with a smooth, almost frictionless motion. You shouldn’t have to push hard, and there should be no gritty spots. If the joint binds or feels tight, the needle bearings are likely preloaded too much. That extra pressure creates heat, wears the bearings faster, and can cause the driveshaft to vibrate even at low speeds.
On the other hand, a joint that spins too loosely has excessive play. You’ll feel a clunk when you shift from drive to reverse. Over time, that play tears the yoke ears and causes the u-joint to fail completely. The right stiffness is the sweet spot where the joint moves freely but with zero slop.
Should New U-Joints Be Stiff? The Short Answer
The direct answer to should new u-joints be stiff is no. A new u-joint should not feel stiff or tight when you rotate it by hand. It should have a smooth, almost buttery feel. If you meet resistance, something is wrong. Let’s break down the different levels of stiffness you might encounter.
Factory OEM U-Joints
Original equipment u-joints are engineered for the exact vehicle application. They come with the correct needle bearing clearance and a proper amount of grease. When you install an OEM replacement, the joint should spin freely and feel neutral. There’s no tight spot, no grinding, and no wobble. This is the baseline you should aim for when you ask yourself should new u-joints be stiff.
Aftermarket and Performance U-Joints
Aftermarket u-joints come in different grades. Some are built with tighter tolerances for high-performance applications. A performance u-joint might feel slightly more rigid than a basic OEM part, but it should still rotate smoothly. If an aftermarket joint feels stiff right out of the box, it could be over-pressured or have a manufacturing defect. Always check the bearing cap rotation before installing it on the driveshaft.
Heavy-Duty and Off-Road U-Joints
Heavy-duty u-joints are designed for trucks that haul loads or go off-road. They use larger bearing caps and stronger crosses. Even these robust joints should not feel stiff. They might have a slightly more solid feel than a standard joint because of the bigger components, but they must still pivot without binding. A stiff heavy-duty u-joint can actually transmit more shock to the drivetrain, which defeats the purpose of the upgrade.
The Right Level of Stiffness
So what is the right level? Think of it like a door hinge. A good hinge swings open and closed with no scraping and no sag. A u-joint works the same way. When you grip the yoke and rotate it, the motion should be even and consistent. Any tight spot, any grinding, or any sudden resistance means the joint is too stiff or has a debris issue. A u-joint that feels loose and wobbly is too far the other direction. You want zero play but free movement.
Signs Your New U-Joint Is Too Stiff or Too Loose
It’s easy to miss the early signs of a u-joint stiffness problem. You might not notice a slight bind until the vibration becomes unbearable. Here’s what to watch for after you install a new universal joint.
Vibration at Highway Speeds
A vibration that gets worse as you speed up is a classic sign. If the new u-joint is too stiff, it won’t absorb the normal flex of the driveshaft. Instead, it locks the shaft into a rigid rotation, and any small misalignment turns into a shaking felt through the floor or the steering wheel. This kind of vibration often starts around 45 to 55 mph and gets worse as you go faster.
Clunking on Gear Changes
When you shift from park to drive or from reverse to forward, a clunk means the joint has too much free play. The driveshaft momentarily stops, then jerks forward. A stiff u-joint can also cause a clunk, but it’s usually a sharper, more abrupt bang because the joint can’t absorb the shock. A smooth, quiet shift is the goal.
Grinding or Clicking Noise
Listen carefully when the vehicle is in gear and the driveshaft is turning. A light grinding or clicking often points to a tight spot in the u-joint. The needle bearings are catching on the cross instead of rolling freely. This can happen if the u-joint was installed with the wrong grease or if dirt got inside the bearing caps during installation.
Grease Leakage from the Yoke
A u-joint that’s too tight can force grease out past the seal. If you see a dark grease streak around the yoke ears, the joint may be binding and creating excess pressure inside the bearing assembly. This not only makes a mess but also means the needle bearings aren’t getting proper lubrication.
Excessive Heat After Driving
After a long drive, carefully touch the u-joint area (when the vehicle is cool enough to avoid burns). An overly stiff u-joint generates extra friction, which turns into heat. If the joint feels noticeably warmer than the surrounding drivetrain components, the stiffness is likely too high.
Quick Tips: Testing U-Joint Stiffness
- Hand-spin test: With the driveshaft off the vehicle, spin the yoke by hand. It should rotate freely with no tight spots.
- Wiggle test: Grab the yoke and try to move it up, down, and side to side. There should be no movement at all.
- Grease check: Apply a thin coat of high-quality chassis grease to the cross and yoke ears before assembly. This helps the needle bearings seat correctly.
- Visual inspection: Look for any bent cross or scored bearing caps. Even a tiny scratch can create a binding point that mimics stiffness.
How to Install New U-Joints with the Right Stiffness
Getting the stiffness right starts with proper installation. A perfect u-joint can feel stiff if it’s installed incorrectly. Follow these steps to make sure your new joint works the way it should.
Step 1: Remove the Old U-Joint Carefully
Use a u-joint puller to extract the old joint from the yoke. Never use a screwdriver or punch to pry it out, as that can damage the yoke ears. Inspect the yoke for wear, cracks, or burrs. A damaged yoke will ruin a new u-joint no matter how good it is.
Step 2: Clean and Inspect All Components
Wipe the yoke ears and the new u-joint cross with a clean rag. Check the needle bearings inside the bearing caps. They should look shiny and smooth, not corroded or bent. If the u-joint came with a grease fitting, make sure it’s clear and unobstructed.
Step 3: Press the Bearing Caps Into the Yoke
Use a bearing press or a soft-face hammer to tap the bearing caps into the yoke ears evenly. Press opposite caps at the same time to keep the cross centered. If you press one side too hard, you’ll create a preload that makes the joint feel stiff. The caps should sit flush with no gaps.
Step 4: Install the Snap Rings or C-Clips
Secure the bearing caps with the retaining snap rings. Make sure they are fully seated in the grooves. A missing or partially seated ring can allow the caps to shift, which changes the stiffness and causes play.
Step 5: Check the Slip Joint
If your driveshaft has a slip joint, slide the yoke onto the shaft splines. The slip joint should move in and out with light resistance. It should not feel gritty or tight. A tight slip joint is often mistaken for a stiff u-joint, but the problem is actually in the spline engagement.
Step 6: Reassemble and Test
Put the driveshaft back on the vehicle. Start the engine and let it idle in drive. Listen for any noise. Then slowly drive the vehicle in a safe area. Pay attention to how the drivetrain feels. Any hesitation, vibration, or clunk means you need to recheck the u-joint stiffness.
Common Mistakes That Make New U-Joints Feel Stiff
Even experienced DIYers can make mistakes that lead to a stiff u-joint. Knowing these pitfalls helps you avoid them.
- Over-greasing the joint: Too much grease can push the needle bearings out of their proper position, creating a tight spot. Use a thin, even coat.
- Using the wrong grease: Chassis grease works for most applications. Never use wheel bearing grease or silicone lube, as they can cause the needle bearings to swell.
- Forcing the cross into the yoke: If the cross doesn’t slide in easily, don’t hammer it. Check for burrs on the bearing caps or dirt in the yoke bore.
- Misaligned yokes: The yoke ears must be in the same plane. If they’re offset, the joint will bind and feel stiff at certain rotation points.
- Ignoring the slip joint angle: The slip joint should operate at a slight angle to allow for suspension movement. A perfectly parallel slip joint can feel tight and cause the joint to bind.
Expert Insight: The Role of Needle Bearings
According to drivetrain specialists, the needle bearings are the heart of u-joint stiffness. When a new u-joint is assembled, the needle bearings sit in a circular cage. The cage keeps the needles evenly spaced so they roll smoothly against the cross and the yoke bore. If the cage is damaged or missing, the needles can overlap and create friction points that feel like stiffness. Always inspect the cage when you open a u-joint, and never reuse old needles.
How to Choose the Right U-Joint for Your Vehicle
Match the U-Joint to Your Application
Not all u-joints are the same. A passenger car u-joint has a different bearing cap size and cross diameter than a heavy-duty truck u-joint. Using the wrong size can lead to a fit that’s either too tight or too loose. Always check your vehicle’s manual or an online parts catalog for the exact part number.
Consider the Driveshaft Material
Steel driveshafts are common and work well with standard u-joints. Aluminum driveshafts are lighter but can be more sensitive to u-joint stiffness. A stiff u-joint on an aluminum shaft can cause the shaft to flex unevenly, leading to premature failure. If you have an aluminum driveshaft, pay extra attention to the smoothness of the new joint’s rotation.
When to Upgrade to a High-Strength U-Joint
If you’ve added a lift kit, larger tires, or a supercharger, your drivetrain sees more stress. In those cases, you might want a high-strength u-joint with a larger cross and bigger bearing caps. These upgrades are still designed to rotate freely, but they handle more torque without flexing. Just remember, even a heavy-duty joint should not feel stiff when you spin it by hand.
Comparison Table: U-Joint Stiffness Levels
| Type | Feel by Hand | Best For | Watch Out For |
|---|---|---|---|
| OEM Stock | Smooth, neutral | Daily driving, stock trucks | None if installed correctly |
| Aftermarket Standard | Smooth, slight resistance | Mild performance upgrades | Cheap brands may have burrs |
| Heavy-Duty | Solid, but still free | Towing, off-road, large tires | Can feel stiff if over-pressured |
| Performance (Chromoly) | Very smooth, minimal play | High-horsepower builds | Expensive; requires perfect installation |
Key Takeaways from the Table
No matter which type you choose, the joint should never feel stiff or bind. The table gives you a general idea of what to expect, but the hand-spin test is your ultimate guide. If the joint doesn’t spin freely, don’t install it until you fix the issue.
Conclusion: Finding the Perfect Balance
So, should new u-joints be stiff? The answer is a clear no. A new u-joint should rotate freely with no binding, no grinding, and no play. The right stiffness keeps your driveshaft humming smoothly, prevents vibration, and protects your transmission and differential from extra wear. By following the installation steps, avoiding common mistakes, and testing the joint before you hit the road, you’ll set yourself up for a long, quiet drivetrain life.
Take a few extra minutes after installation to do the hand-spin test and the wiggle test. Listen for noises on your first short drive. If anything feels off, recheck the u-joint stiffness right away. A small adjustment now can save you from a costly driveshaft repair later. Your vehicle deserves a drivetrain that works as hard as you do, and that starts with the right u-joint feel.
Final Quick Tip
Keep a small grease gun handy and lubricate your u-joints every 5,000 miles or whenever you notice a slight click. Fresh grease keeps the needle bearings floating on a thin film of oil, which is the secret to smooth, long-lasting u-joint operation.
Frequently Asked Questions
What happens if a new u-joint is too stiff?
An overly stiff u-joint creates excess friction inside the bearing assembly. That friction leads to heat buildup, worn needle bearings, and vibration at speed. In severe cases, the joint can bind completely and stall the driveshaft, which puts shock loads on the transmission and yoke.
How can you tell if a u-joint is too loose?
Grab the driveshaft and try to rotate it back and forth. If you feel any play or a clunking sensation, the u-joint has too much free movement. A loose u-joint will often make a rattling noise when you first start moving, and it can cause the driveshaft to wear out the slip joint splines.
Do u-joints get stiffer as they age?
Yes, old u-joints can become stiff because dried-out grease turns into a gritty paste. Dirt and corrosion also build up inside the bearing caps. That’s why regular lubrication or replacement is important. A new u-joint should feel smooth, not stiff.
Can you adjust u-joint stiffness after installation?
You can’t really adjust the internal stiffness of a u-joint. If the joint feels stiff, you need to remove it and inspect the needle bearings, the cross, and the yoke ears for damage or debris. Sometimes simply cleaning and re-greasing the joint fixes the problem.
Are greasable u-joints better than sealed ones?
Greasable u-joints allow you to add fresh lubrication, which helps prevent stiffness caused by dried grease. Sealed u-joints are maintenance-free but can’t be re-greased. For most daily drivers, a greasable u-joint is a smart choice because it lets you keep the joint smooth and free of grit.
Should you replace both u-joints on a driveshaft at the same time?
Yes, it’s a good idea to replace both u-joints at the same time, even if only one looks worn. Matching the stiffness and condition of both joints ensures the driveshaft operates evenly. Replacing just one can leave you with a mismatched pair that causes vibration or uneven wear.